 The stem stitch is your friend. I consider it one of the most useful stitches there is. it can loop and curve and go straight and always looks perfect. Just remember to make your stitches shorter when going around a curve and you’ll be fine. One of things I do the most is to use several rows of stem stitch in graded colors to create a gradient. I love the way it feels and the shading possibilities. The stem stitch is your friend. I consider it one of the most useful stitches there is. it can loop and curve and go straight and always looks perfect. Just remember to make your stitches shorter when going around a curve and you’ll be fine. One of things I do the most is to use several rows of stem stitch in graded colors to create a gradient. I love the way it feels and the shading possibilities. |
The Stitch
 I use the stem stitch to outline motifs and to make vines and lines. The stem stitch is sometimes confused with the Outline Stitch. The difference is that the Stem stitch needle comes out of the fabric above the thread and the Outline stitch needle comes out of the fabric below the thread. The stem stitch looks ropey with the threads being visible in each stitch. The outline stitch is much smoother with the visible distinction between stitch threads less discernible and less ropey. Both stitches have their good uses. I prefer the Stem Stitch because I generally like the ropey textured effect better. I use the stem stitch to outline motifs and to make vines and lines. The stem stitch is sometimes confused with the Outline Stitch. The difference is that the Stem stitch needle comes out of the fabric above the thread and the Outline stitch needle comes out of the fabric below the thread. The stem stitch looks ropey with the threads being visible in each stitch. The outline stitch is much smoother with the visible distinction between stitch threads less discernible and less ropey. Both stitches have their good uses. I prefer the Stem Stitch because I generally like the ropey textured effect better.
|
 Stitching over a drawn line. Note that you can see that I tend to give my leaves and branches a bit of a point effect using the stem stitch and a straight stitch to fill in the point. Stitching over a drawn line. Note that you can see that I tend to give my leaves and branches a bit of a point effect using the stem stitch and a straight stitch to fill in the point. |
 Stitching around an applique motif the first time Stitching around an applique motif the first time |
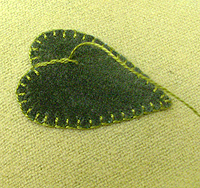
 Stitching around an applique motif the second time in a new color Stitching around an applique motif the second time in a new color |
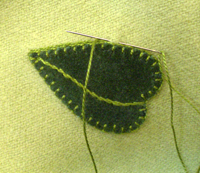
 Stitching a vein in a leaf freehand Stitching a vein in a leaf freehand |
 The Tie Off: I like to bury my threads in the back of my work as often as possible. You can see that I do tie a knot at the beginning (to the left and below the point of the needle in the photo). When I’m done with the color I’m using or have completed my motif, I bring my needle and thread to the back of the work. Doing a shallow running stitch (make sure you don’t pierce the motif and have your knot show in the right side of your work) I work the needle through the ground fabric a couple stitches. The Tie Off: I like to bury my threads in the back of my work as often as possible. You can see that I do tie a knot at the beginning (to the left and below the point of the needle in the photo). When I’m done with the color I’m using or have completed my motif, I bring my needle and thread to the back of the work. Doing a shallow running stitch (make sure you don’t pierce the motif and have your knot show in the right side of your work) I work the needle through the ground fabric a couple stitches. |
 I turn my work and stitch back along those same few stitches so that I sew the thread to itself. This is a very sturdy tie off. I turn my work and stitch back along those same few stitches so that I sew the thread to itself. This is a very sturdy tie off. |
 The stem stitch is your friend. I consider it one of the most useful stitches there is. it can loop and curve and go straight and always looks perfect. Just remember to make your stitches shorter when going around a curve and you’ll be fine. One of things I do the most is to use several rows of stem stitch in graded colors to create a gradient. I love the way it feels and the shading possibilities.
 Stitching over a drawn line. Note that you can see that I tend to give my leaves and branches a bit of a point effect using the stem stitch and a straight stitch to fill in the point.
 Stitching around an applique motif the first time
 Stitching around an applique motif the second time in a new color
 Stitching a vein in a leaf freehand
 The Tie Off: I like to bury my threads in the back of my work as often as possible. You can see that I do tie a knot at the beginning (to the left and below the point of the needle in the photo). When I’m done with the color I’m using or have completed my motif, I bring my needle and thread to the back of the work. Doing a shallow running stitch (make sure you don’t pierce the motif and have your knot show in the right side of your work) I work the needle through the ground fabric a couple stitches.
 I turn my work and stitch back along those same few stitches so that I sew the thread to itself. This is a very sturdy tie off.
